
Fast Startup is a free, handy tool that lets you boot your Windows operating system more speedily after a shutdown or hibernate.
When you have the Fast Startup enabled on your PC, your operating system will help you save the kernel sessions and device drivers right into your hard drive when you shut down your PC.
In contrast, when your operating system will have to reload the kernel sessions and device drivers in cases where you have Fast Startup disabled. So, let’s look at how you can enable Fast Startup on your Windows and save yourself from the boring wait time of slowly booting up your Windows PC.
How to enable Fast Startup on a Windows PC
Microsoft first introduced Fast Startup with Windows 8 as a replacement for the ‘hibernate’ feature from Windows 7. Fast Startup has since carried on to newer versions of Windows operating, now running in Windows 10 and Windows 11 as well.
While Fast Startup is supported in almost all modern Windows computers after Windows 8, it might not run in older, lower-end computers.
Moreover, it might also not work if you have Secure Boot disabled or if it doesn’t support the necessary hardware. You can easily check if Fast Startup is supported on your PC when you try to enable it on your PC. So, to enable Fast Startup on your Windows PC, follow the steps below:
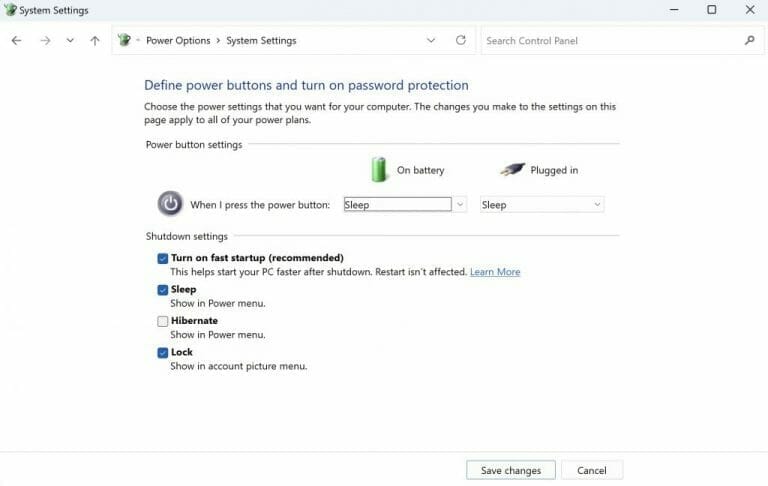
- Head to the Start menu search bar, type in “power options” and select the best match.
- From the Control Panel, select Choose what the power buttons do from the left-hand side.
- Then scroll down to the Shutdown settings section and check if Turn on fast startup option is available. If it’s not, then Fast Startup isn’t support on your PC.
- But, if you see the Fast Startup option, then select the box next to Turn on fast startup (recommended).
- From there, click on Save changes to apply the setting.
Fast Startup will be enabled, and you will have very fast bootups from here on. But every rose has its thorn, and Fast Startup isn’t much different. While the short time during startups is a boom for Windows users, Fast Startup can cause problems with specific programs or boot specification like dual booting, delay or failures with installing Windows updates, and generally require more disk usage.
So if you are facing problems with Windows Fast Startup, you might have to disable it.
To disable Fast Startup on your Windows, simply do the opposite of the above steps. Here’s how:
- In the Control Panel settings from above, make sure you’re in the Shutdown settings section of the Change settings that are currently unavailable option.
- From there, uncheck the Turn on fast startup (recommended) radiobox.
- Finally, click on Save changes to apply these settings to your PC.
Enabling and disabling Fast Startup on a Windows PC
Fast Startup fastens up your Windows boot-up speed by a significant margin. Hopefully, you could easily enable it following the above steps. However, we also understand that in some cases, Fast Startup might, in fact, work against you; in those cases, you follow the below steps and disable your Fast Startup settings as well.